Today we are going to see how to install Home Assistant and some complements on docker using a docker-compose file. Consequently, this stack will provide the following services:
- hass, the core of Home Assistant.
- mariadb, to replace the default database engine SQLite.
- mosquitto, a well known open source mqtt broker.
- nodered, a browser-based flow editor to write your automations.
- hass-configurator, a filesystem-browser and text-editor for your configuration files.
In addition, we will be able to install portainer, a web application to manage your containers easily.
This procedure has been tested in arm (Raspberry Pi) and x86_64 architectures. For instructions on how to install docker and docker-compose on your Raspberry Pi you can check this article.
.env file
A few environment variables will be declared in a file named .env, in the same directory where the docker-compose file is. As a result, these variables will be populated later into our docker-compose file at the moment the containers are created.
Security advise
The purpose of this stack is to have a working Home Assistant installation with some accessories. This means that it is not secure by default so you should NEVER expose it to the internet as is. I will explain some steps to secure it in a next article, for example how to password protect Node-RED and hass-configurator and how to hide Home Assistant behind a reverse proxy like nginx using ssl certificates.
Preparation
Create a directory where we will put all needed config and our docker-compose file itself. As an example, I will be using a directory named ‘hass’. We will then precreate a directory structure to maintain configuration and data of the services. To clarify, structure will be as shown below and should be created as a normal non-root user.
pi@raspberrypi:~/hass $ tree -a
.
├── configurator-config
│   └── settings.conf
├── docker-compose.yaml
├── .env
├── hass-config
│   └── configuration.yaml
├── mariadb
├── mosquitto
│   ├── config
│   │   └── mosquitto.conf
│   ├── data
│   └── log
└── nodered
The content of the required files is as follows:
- configurator-config/settings.conf
{
    "BASEPATH": "../hass-config"
}
- .env: This file will hold the root password for mariadb and the password for the ha_db database, so fill them with your preferences. PUID and PGID will be the uid and gid of the user who created the directory structure, you can check these ids typing ‘id’ as that user.
MYSQL_ROOT_PASSWORD=mariadbrootpassword
HA_MYSQL_PASSWORD=ha_dbdatabasepassword
PUID=1000
PGID=1000
- hass-config/configuration.yaml: This will be the basic configuration file for Home Assistant, replace <hostip> with the internal ip of the host where the docker engine is installed and <ha_dbdatabasepassword> with the password you chose for the ha_db database
default_config:

# For homeassistant v2021.7.0 and above add this http block
http:
  use_x_forwarded_for: true
  trusted_proxies:
    - XXX.XXX.XXX.XXX # Add the IP address of the proxy server

panel_iframe:
  configurator:
    title: Configurator
    icon: mdi:wrench
    url: http://<hostip>:3218/
    require_admin: true
  nodered:
    title: Node-Red
    icon: mdi:shuffle-variant
    url: http://<hostip>:1880/
    require_admin: true

mqtt:
  broker: <hostip>

recorder:
  db_url: mysql://homeassistant:<ha_dbdatabasepassword>@<hostip>/ha_db?charset=utf8
  purge_keep_days: 30
- mosquitto/config/mosquitto.conf: minimal config for mosquitto
persistence true
persistence_location /mosquitto/data/
log_dest file /mosquitto/log/mosquitto.log

listener 1883
allow_anonymous true
docker-compose file
Finally here is our docker-compose.yaml file. As this is a yaml file, be aware about keeping the correct indentation. This file works for Raspberry Pi. For x86_64 architecture you should replace image name of hass-configurator by ‘causticlab/hass-configurator-docker:x86_64’, that’s it.
version: '3'
services:
  homeassistant:
    container_name: hass
    image: homeassistant/home-assistant
    volumes:
      - ./hass-config:/config
      - /etc/localtime:/etc/localtime:ro
    restart: unless-stopped
    network_mode: host
    depends_on:
      - mariadb
      - mosquitto

  mariadb:
    image: linuxserver/mariadb
    container_name: mariadb
    restart: unless-stopped
    environment:
      MYSQL_ROOT_PASSWORD: "${MYSQL_ROOT_PASSWORD}"
      MYSQL_DATABASE: ha_db
      MYSQL_USER: homeassistant
      MYSQL_PASSWORD: "${HA_MYSQL_PASSWORD}"
      PUID: 1000
      PGID: 1000
    volumes:
      - ./mariadb:/config
    ports:
      - "3306:3306"

  nodered:
    container_name: nodered
    image: nodered/node-red
    ports:
      - "1880:1880"
    volumes:
      - ./nodered:/data
    depends_on:
      - homeassistant
      - mosquitto
    environment:
      TZ: "Europe/Madrid"
    restart: unless-stopped

  mosquitto:
    image: eclipse-mosquitto
    container_name: mosquitto
    restart: unless-stopped
    ports:
      - "1883:1883"
    volumes:
      - "./mosquitto/config:/mosquitto/config"
      - "./mosquitto/data:/mosquitto/data"
      - "./mosquitto/log:/mosquitto/log"
    environment:
      - TZ=Europe/Madrid
    user: "${PUID}:${PGID}"

  hass-configurator:
    image: "causticlab/hass-configurator-docker:arm"
    container_name: hass-configurator
    restart: unless-stopped
    ports:
      - "3218:3218/tcp"
    depends_on:
      - homeassistant
    volumes:
      - "./configurator-config:/config"
      - "./hass-config:/hass-config"
    user: "${PUID}:${PGID}"

#  portainer:
#    ports:
#      - "9000:9000"
#    container_name: portainer
#    restart: unless-stopped
#    volumes:
#      - "/var/run/docker.sock:/var/run/docker.sock"
#      - "./portainer/portainer_data:/data"
#    image: portainer/portainer-ce
Now it is time to execute our compose file in order to create and run our services, so type ‘docker-compose up -d’ from the hass directory and the process will start, downloading images, creating containers and so on. After a while you will be presented the Home Assistant onboarding page in the url ‘http://<hostip>:8123’
If you are migrating from an older Home Assistant installation, you should copy over the content of your old configuration directory, including hidden files and folders, to the hass-config folder. Probably you will need to make some adjustments to your configuration, but it should work as expected.
Node-RED configuration
In order for Node-RED to be fully functional, further configuration should be done in Node-RED itself. From inside Home Assistant, click the Node-RED icon in the left bar.
- Add Home Assistant nodes to Node-RED: From the Node-RED menu on the top right bar select ‘Manage palette’, then in the install tab search for ‘node-red-contrib-home-assistant-websocket’ and install the module.
- Configure the mqtt broker: After putting an input or output mqtt node on a flow, you will be able to configure the mqtt broker in Node-RED editing the server field of the node. More info here.
- Configure connexion with Home Assistant: You need to edit an Events: all node on your workspace and fill the Home Assistant url and the access token. Information about this and how to generate an access token in Home Assistant can be found here.
NOTE: Node-RED should be restarted for this configurations to take effect. To restart the Node-RED container execute ‘docker restart nodered’
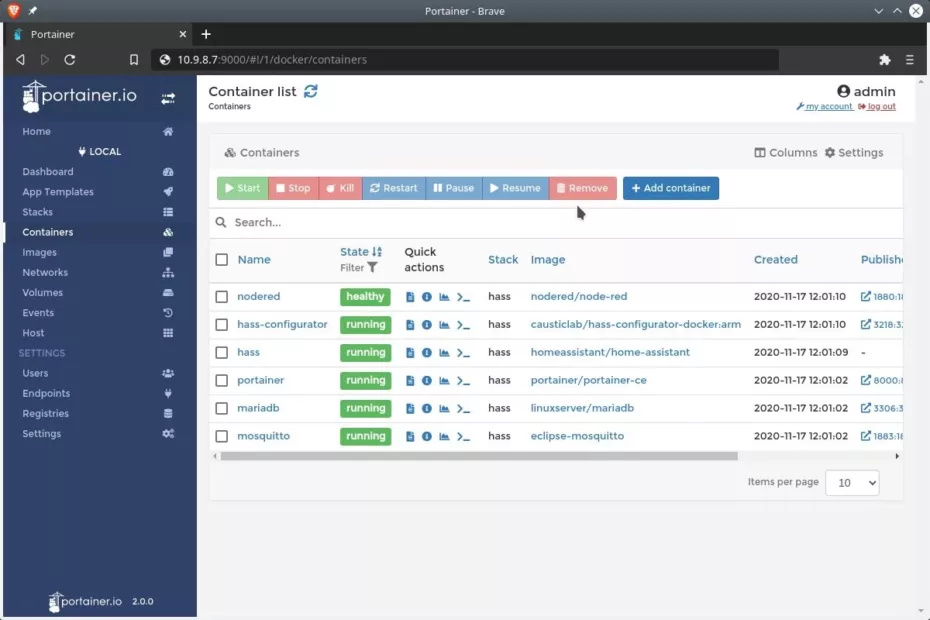
Portainer
As you can see, portainer service is commented at the end of the compose file. Should you need it, create the directory ‘./portainer/portainer_data’, uncomment the service in docker-compose.yaml and run ‘docker-compose up -d portainer’ to create the container. After this, you can access portainer on the url ‘http://<hostip>:9000’, then you should create a password for the admin user and select ‘Manage the local Docker environment’ in the next screen. Click on Connect and you are done, enjoy it.
Conclusion
We have seen how to install Home Assistant and some other components under docker using docker-compose. We will be improving this stack in next articles. If you have any question, leave a comment.
Great post!
I have just added zigbee2mqtt to the docker compose following this instructions
https://www.zigbee2mqtt.io/information/docker.html and now I have a complete hass docker installation with all my current needs.
Becareful autentication changed in mosquitto 2.0+ to default to needing to be defined. Previously you could connect without authentication.
One needs to at least add
“`
allow_anonymous true
listener 1883
“`
to the configuration file continue using mosquitto without authentication so that it will start. Here is a link to the mosquitto documentation about [Migrating from 1.x to 2.0](https://mosquitto.org/documentation/migrating-to-2-0/) that explains the options.
Hi, thanks for the notice, I have updated the post accordingly with this information. Regards.
This implementation of HA has been the most reliable for me and the easiest to “kill” and rebuild if a problem occurs. Than you so much for the inspiration and tutorial.
Could your stack be modified to include NGINX and Wireguard containers? In a previous KVM implementation of HA, I had a number of services added through the “supervisor”…I am assuming these could all be added as separate containers using this docker-compose approach?
Sure! You can easily add any other container/service to this docker-compose stack. For wireguard I can recommend you the linuxserver/wireguard docker image, I have been using it flawless for a while. For nginx you can opt for the official image or any other out there depending of your needs.
Thanks for your comment. Regards.
In order to get the nodered container to start, I had to add the following:
user: “${PUID}:${PGID}”
Without this, it threw an error:
nodered | Error: EACCES: permission denied, copyfile ‘/usr/src/node-red/node_modules/node-red/settings.js’ -> ‘/data/settings.js’
Hi, thanks for your comment. This is probably because the user id with which you created the folder structure was not 1000 (the user id that the container runs with). You got it the right way. If I can help you in any manner please let me know.
Hi. Thanks for great tut. I created folder structure with root user, so it means ID 0. Everything is working except nodered. In HA, there are no any buttons in nodered panel everything is empty and with docker ps , I can see that nodered is starting on port 1880 straight after executing docker start nodered, but few seconds after that, it going to restart and not working (STATUS: Restarting (1) 18 seconds ago)
Nvm, I already solved it. Thanks once again for great tut, you can throw both my comments to trash, they’re not useful.
Hi, glad you got it solved. If you can tell us what the root cause was perhaps It could help others with the same issue. Regards.
Great post, thank you! Are there any additional tricks to getting nodered to work? In home assistant, I receive an refused to connect when clicking on the Node-Red nav.
Not sure what can be the cause. Usually this ‘refused to connect’ message is due to SSL issues (e.g. not using ssl to access node red, mixed content) or x-frame options (e.g. x-frame-options: SAMEORIGIN) Perhaps your browser developer tools could give you a hint on what is causing the error. Hope this helps. Regards.
I had this same problem. It was due to nodered not starting up successfully. I think what fixed it for me was adding this to the “nodered:” stanza in the docker-compose.yaml:
user: ${PUID}
Other change I made were to correct the timezone in the 2 places it appears. That is probably unrelated.
Hi, thanks for your comment, It can help others with the same issue.
Thank you for this tutorial. I am a noob and don’t know how to solve problems in Linux I followed your tutorial on a raspberry pi 3 and could not get to hass web page. I found the solution was to add “privileged: true” to the docker-compose file for the hass container. You did mention to run the command as root but I just ran “sudo docker-compose up -d” not sure if this caused the problem.
Hi, not sure about what the problem can be, probably folder permissions or a similar issue. I do not think that using sudo is the problem. I’m glad that you got it solved. Regards.
Hi,
Do you maybe know why home assistant is not working while im trying to open with my IP: 8123?
Everything seems to be composed good 🙁
Hi, It can be by several reasons, like folder permissions, etc. I would need more info in order to help you further. Perhaps container logs could give a hint about what is happening. Paste the log here If you want me to take a look. Regards.
I am also having issues with the HA page not loading @ MY_IP:8123. Nodered and HASS Configurator both load fine.
The error I see in the HASS Configurator
home-assistant.log:
2022-07-10 21:06:49 ERROR (Recorder) [homeassistant.components.recorder.core] Error during connection setup: (MySQLdb.OperationalError) (2002, “Can’t connect to MySQL server on ” (115)
Hi, seems that cannot connect with the database, is mariadb container up and running without errors? If so, check your connection string for any misspelling. Have you made any extra change to the docker compose file?
Not sure why, but I had to use the hostname and couldn’t use the IP to get the web interface to work
Hi, It sounds strange to me. Since We are using network mode host for the container, port 8123 should be open on the host and accessible by its ip. Anything in logs and/or developer tools?
[don’t publish my previous message]
In case you are using ubuntu-21.10-preinstalled-server-arm64+raspi.img uninstall mosquitto first with sudo apt-get remove mosquitto. I’m shamed to admit I wasted 2 hours puzzling why I couldn’t get this running. Now it works lika a charm.
Hi thanks for the hint, I did not know about mosquitto being preinstalled in any distro variant. I am sure this can help others facing a similar issue. Regards.
Hello, I would like to know if this is possible in an arm architecture. I want to install HA in Docker with Kali Linux
Hi, I think so. It sounds to me that there are HA docker images for different architectures, check the image repo site to see if there is one that suits yours. The same goes for the rest of the containers. But from memory I would say that yes, you can install it in an arm architecture. Let us know if you succeeded at this. Hope this helps, Regards.
Thanks for the writeup. It worked pretty well for me, but I did run into some issues when everything started up for the first time. The logs indicated that the homeassistant user could not connect to the database. I fixed this by logging into the database and creating the homeassistant user, creating the ha_db database, and granting permissions for the homeassistant user on the ha_db database.
Hi, thanks for your comment. It sounds weird for me, provided you are using the compose and .env files, linuxserver mariadb container should create the user and database as specyfied in docker-compose.yml